[<– previous section | next section –>]
0. Introduction

2. The Conversion Overview

3. The Conversion Details

4. Main Components

5. Schematics

6. Arduino Code
Connections
AC Power
connect to regular 110V AC power
this is the black cord coming out of the back of the unit
Strobe LED connector
phone-style connector for external strobe pulse LED (modified to operate on 12V)
located on the right side of the unit
USB cable
optional connection of internal Arduino board to computer
use Arduino software to modify and monitor code
Controls
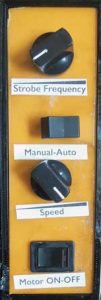
Power ON/OFF
main power switch; positive feedback through green status LED
located on the right side of the unit
Control box
located on the right side of the unit
Strobe Frequency
when in manual mode this will allow to set the strobe frequency
Manual/Auto Mode
in manual mode strobe frequency is not synced to turntable
in auto mode the optical cartridge will try to synchronize the strobe signal with black markings on the bottom of the turntable
Rotation Speed
controls the rotation speed of the turntable; about 10 – 100rpm(?)
Turntable ON/OFF
starts/stops the turntable
Status LEDs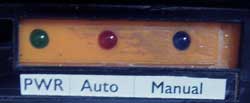
Status indicator LEDs
Power on (GREEN)
Auto Mode (RED)
Manual Mode (BLUE)